With ansible-builder you can configure and build portable, consistent, customized Ansible control nodes that are packaged as containers by Podman or Docker. These containers are known as execution environments. You can use them on AWX or Ansible Controller, with Ansible Navigator, for local playbook development and testing, in your CI pipelines, and anywhere else you run automation.
You can design and distribute specialized execution environments for your Ansible content, choosing the versions of Python and ansible-core you want, and installing only the Python packages, system packages, and Ansible collections you need for your tasks.


As many of you know, I have moved almost all my repositories from Github to Codeberg a while ago. Now I want to take it to the next level: Build my own little CI/CD engine!
Now, codeberg offers CI/CD with their Woodpecker instance at ci.codeberg.org, which I used in the past for example to build this blog but as codeberg is based on forgejo, you can have an even more interesting way to build your stuff — Forgejo Actions. So let’s explore that road!


Toolbx is a tool for Linux, which allows the use of interactive command line environments for software development and troubleshooting the host operating system, without having to install software on the host. It is built on top of Podman and other standard container technologies from OCI.
Toolbx environments have seamless access to the user’s home directory, the Wayland and X11 sockets, networking (including Avahi), removable devices (like USB sticks), systemd journal, SSH agent, D-Bus, ulimits, /dev and the udev database, etc..
Learn more about Toolbx in the documentation.


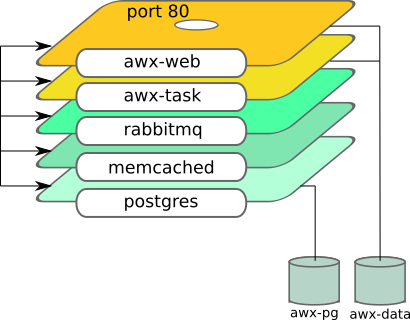
This Ansible role sets up Ansible AWX server using containers. It uses podman to do it.
See this blog how to use it: Automate Podman Containers with Ansible 2/2
Role dependency


Let’s talk about Docker and Nix today. Before explaining what Nix is, if you don’t know yet, and before going into the details, I will show you a snippet similar to a Dockerfile for creating a Redis image equivalent to the one in docker hub.
The final image will be around 42mb (or 25mb) in size, compared to 177mb.
EDIT: as mentioned on HN, alpine-based images can even go around 15mb in size.
If you want to try this, the first step is to install Nix.
- Podman (Pod Manager) Global Options, Environment Variables, Exit Codes, Configuration Files, and more
- attach Attach to a running container
- auto-update Auto update containers according to their auto-update policy
- build Build an image using instructions from Containerfiles
- commit Create new image based on the changed container
- container Manage containers
- cp Copy files/folders between a container and the local filesystem
- create Create but do not start a container
- diff Display the changes to the object’s file system
- events Show podman system events
- exec Run a process in a running container
- export Export container’s filesystem contents as a tar archive
- farm Farm out builds to remote machines
- generate Generate structured data based on containers, pods or volumes
- healthcheck Manage health checks on containers
- history Show history of a specified image
- image Manage images
- images List images in local storage
- import Import a tarball to create a filesystem image
- info Display podman system information
- init Initialize one or more containers
- inspect Display the configuration of object denoted by ID
- kill Kill one or more running containers with a specific signal
- kube Play containers, pods or volumes from a structured file
- load Load image(s) from a tar archive
- login Log in to a container registry
- logout Log out of a container registry
- logs Fetch the logs of one or more containers
- machine Manage a virtual machine
- manifest Manipulate manifest lists and image indexes*
- mount Mount a working container’s root filesystem
- network Manage networks
- pause Pause all the processes in one or more containers
- pod Manage pods
- port List port mappings or a specific mapping for the container
- ps List containers
- pull Pull an image from a registry
- push Push an image to a specified destination
- rename Rename an existing container
- restart Restart one or more containers
- rm Remove one or more containers
- rmi Remove one or more images from local storage
- run Run a command in a new container
- save Save image(s) to an archive
- search Search registry for image
- secret Manage secrets
- start Start one or more containers
- stats Display a live stream of container resource usage statistics
- stop Stop one or more containers
- system Manage podman
- tag Add an additional name to a local image
- top Display the running processes of a container
- unmount Unmount working container’s root filesystem
- unpause Unpause the processes in one or more containers
- unshare Run a command in a modified user namespace
- untag Remove a name from a local image
- update Update an existing container
- version Display the Podman version information
- volume Manage volumes
- wait Block on one or more containers

HereDoc notation has been used for a while now in Bash, SQL, PHP, and other scripting languages. It allows a very long command to be broken down into several more readable lines while still being treated as a single command.
- Buildah v1.35
- Podman v5.0
FROM docker.io/redhat/ubi9-minimal as builder

RUN <<EOF
microdnf update
microdnf -y install gcc
microdnf -y install glibc-static
microdnf -y install procps-ng
EOF
Kubernetes installations can be complex with multiple runtime dependencies and runtime engines. CRI-O was created to provide a lightweight runtime for Kubernetes which adds an abstraction layer between the cluster and the runtime that allows for various OCI runtime technologies. However you still have the problem of daemon dependencies in your cluster for builds - I.e. if you are using the cluster for builds you still need a Docker daemon.
Enter Buildah. Buildah allows you to have a Kubernetes cluster without any Docker daemon for both runtime and builds. Excellent. But what if things go wrong? What if you want to do troubleshooting or debugging of containers in your cluster? Buildah isn’t really built for that, what you need is a client tool for working with containers and the one that comes to mind is Docker CLI - but then you’re back to using the daemon.

Dieser Artikel gibt meine Motivation für den Bau von Container-Images und die Vorgehensweise wieder und zeigt, wie ich mit Buildah meine OCI-kompatiblen Container-Images erstelle.
Es handelt sich dabei mehr um einen Erfahrungsbericht als ein Tutorial und ich erhebe keinen Anspruch auf Vollständigkeit. Das behandelte Beispiel ist jedoch zum Einstieg und zur Nachahmung für all jene geeignet, die Container ausführen können und diese gerne ohne Verwendung von Containerfiles bauen möchten.

You can use Docker with the Dev Containers extension in a few ways:
- Docker installed locally.
- Docker installed on another machine or remote environment.
- You only need Docker installed on the remote host, rather than Docker installed locally.
- Other Docker compliant CLIs, installed locally or in a remote environment.
- For instance, Rancher Desktop is another way to install Docker, providing container management and Kubernetes on Windows, macOS, and Linux.
- Since Rancher Desktop supports Docker CLI via Moby, you can use Dev Containers extension with it. You may learn how to get started in Rancher Desktop's guide.
- Dev Containers interacts with CLIs; it makes no assumptions about how a container engine works and does not interact with container engines or daemons directly.
- Note that other Docker compliant CLIs are not officially supported.
Continue reading to learn alternate ways you can install and use Docker or a Docker compliant CLI.
- VSCode extension: Dev Containers
- GitHub - microsoft/vscode-remote-release: Visual Studio Code Remote Development: Open any folder in WSL, in a Docker container, or on a remote machine using SSH and take advantage of VS Code's full feature set.
- Visual Studio Code Remote Development
- Developing inside a Container using Visual Studio Code Remote Development

Have you ever wondered about running Podman in a container: Podman in Podman, Podman in Docker, or even Podman in Kubernetes?
One of the most asked about topics to folks working on upstream container technologies is running Podman within a container. Most of this has historically been related to Docker in Docker (DIND), but now, people also want to run Podman in Podman (PINP) or Podman in Docker (PIND).
But Podman can be run in multiple ways, rootful and rootless. We end up with people wanting to run various combinations of rootful and rootless Podman:
- Rootful Podman in rootful Podman
- Rootless Podman in rootful Podman
- Rootful Podman in rootless Podman
- Rootless Podman in rootless Podman
You get the picture.
This blog will attempt to cover each combination, starting with a discussion of privileges. We'll start with the PINP scenario here in part one. In part two of the series, we'll cover similar ground but do so within the context of Kubernetes. Be sure to read both articles for a complete picture.
Rootless Podman running rootless Podman
$ podman run \
    --security-opt \
    label=disable \
    --user podman \
    --device /dev/fuse \
    quay.io/podman/stable \
    \
    podman run alpine echo hello


This Docker image provides:
- Asciidoctor 2.0.23
- Asciidoctor Diagram 2.3.1 with ERD and Graphviz integration (supports plantuml and graphiz diagrams)
- Asciidoctor PDF 2.3.17
- Asciidoctor EPUB3 2.1.3
- Asciidoctor FB2 0.7.0
- Asciidoctor Mathematical 0.3.5
- Asciidoctor reveal.js 5.1.0
- AsciiMath
- Source highlighting using Rouge, CodeRay or Pygments
- Asciidoctor Confluence 0.0.2
- Asciidoctor Bibtex 0.9.0
- Asciidoctor Kroki 0.10.0
- Asciidoctor Reducer 1.0.2
This image uses Alpine Linux 3.20.1 as base image.


ubi8-asciidoctor
A utility image for the UBI8 image + asciidoctor.
Contains the primary used asciidoctor-pdf for generating reports.
It's base is from https://github.com/asciidoctor/docker-asciidoctor but now ubi based.
Purpose
Useful for environments where these libraries/tools are needed such as:
- local development
- CI tools that do not require specific CI tooling configuration, such as GiLab Jobs.
Published
https://quay.io/repository/redhat-cop/ubi8-asciidoctor via GitHub Workflows.
passt implements a translation layer between a Layer-2 network interface and native Layer-4 sockets (TCP, UDP, ICMP/ICMPv6 echo) on a host. It doesn't require any capabilities or privileges, and it can be used as a simple replacement for Slirp.
Podman is a daemonless container engine for developing, managing, and running Open Container Initiative (OCI) containers on Linux systems. Included in Red Hat Enterprise Linux 7.6 and later, Podman lets you create and manage rootless containers, which don't require root access to be built and deployed.
Podman is an excellent alternative to Docker containers when you need increased security, unique identifier (UID) separation using namespaces, and integration with systemd.
Download the Podman Cheat Sheet and explore basic commands for managing images, containers, and container resources. You’ll learn how to:
- Work with image repositories
- Build container images
- Create and run containers
- Manage container processes and resources
- Work with a host compiler’s file system
With Red Hat Developer cheat sheets, you get essential information right at your fingertips so you can work faster and smarter. Easily learn new technologies and coding concepts and quickly find the answers you need.

The original Quadlet repository describes Quadlet this way:
What do you get if you squash a Kubernetes kubelet?
A quadlet
Quadlet is a tool for running Podman containers under systemd in an optimal way by allowing containers to run under systemd in a declarative way. It has been merged into Podman 4.4.


Podman uses two different means for its networking stack, depending on whether the container is rootless or rootfull. When rootfull, defined as being run by the root (or equivalent) user, Podman primarily relies on the containernetworking plugins project. When rootless, defined as being run by a regular user, Podman uses the slirp4netns project.
#Networking and Podman pods
By definition, all containers in a Podman pod share the same network namespace. This fact means that they will have the same IP address, MAC addresses, and port mappings. You can conveniently communicate between containers in a pod by using localhost.

It seems once people master the basics of containers, networking is one of the first aspects they begin experimenting with. And regarding networking, it takes very little experimentation before ending up on the deep end of the pool. The following guide shows the most common network setups for Podman rootful and rootless containers. Each setup is supported with an example.

This repo hosts the containers.podman Ansible Collection.
The collection includes the Podman container plugins to help the build and management of Podman containers.
Documentation
For collection versions that are parts of Ansible releases, the documentation can be found on Ansible docs site: https://docs.ansible.com/ansible/latest/collections/containers/podman
The latest documentation for current collection version in the repository is hosted on github.io docs site: https://containers.github.io/ansible-podman-collections.