Imagine a system with one or more LUKS encrypted partitions (root or others) or volumes and you need to unlock these partitions/volumes during startup. In this case you need to be able to log in remotely and provide a password at the early boot phase. This can be achieved by using one or more mkinitcpio hook(s) that configure a network interface and start some kind of SSH server. Some packages listed below contribute various mkinitcpio build hooks to ease the configuration. The following tutorials add a remote unlocking method in addition to the existing local console password prompt.


If your machine doesn't currently have an operating system installed, you can still run nixos-anywhere remotely to automate the install. To do this, you would first need to boot the target machine from the standard NixOS installer. You can either boot from a USB or use netboot.
The NixOS installation guide has detailed instructions on how to boot the installer.
When you run nixos-anywhere, it will determine whether a NixOS installer is present by checking whether the /etc/os-release file contains the identifier VARIANT_ID=installer. This identifier is available on releases NixOS 23.05 or later.
If an installer is detected, nixos-anywhere will not attempt to kexec into its own image. This is particularly useful for targets that don't have enough RAM for kexec or don't support kexec.
NixOS starts an SSH server on the installer by default, but you need to set a password in order to access it.

Setting up a new machine is time-consuming, and becomes complicated when it needs to be done remotely. If you're installing NixOS, the nixos-anywhere tool allows you to pre-configure the whole process including:
- Disk partitioning and formatting
- Configuring and installing NixOS
- Installing additional files and software
You can then initiate an unattended installation with a single CLI command. Since nixos-anywhere can access the new machine using SSH, it's ideal for remote installations.
Once you have initiated the command, there is no need to 'babysit' the installation. It all happens automatically.
You can use the stored configuration to repeat the same installation if you need to.

So I’m about to teach you a bunch of tricks for efficiently tunneling whatever you want over seemingly innocuous openings in a customer’s firewall. These tricks will culminate with the most cursed trick of all, which is tunneling inbound SSH connections inside of outbound HTTPS requests. This will grant you full command-line access to your on-premises hosts using the most benign firewall permission that a customer can grant. Moreover, this post is accompanied by a repository named holepunch containing NixOS modules automating this ultimate trick which you can either use directly or consult as a working proof-of-concept for how the trick works.

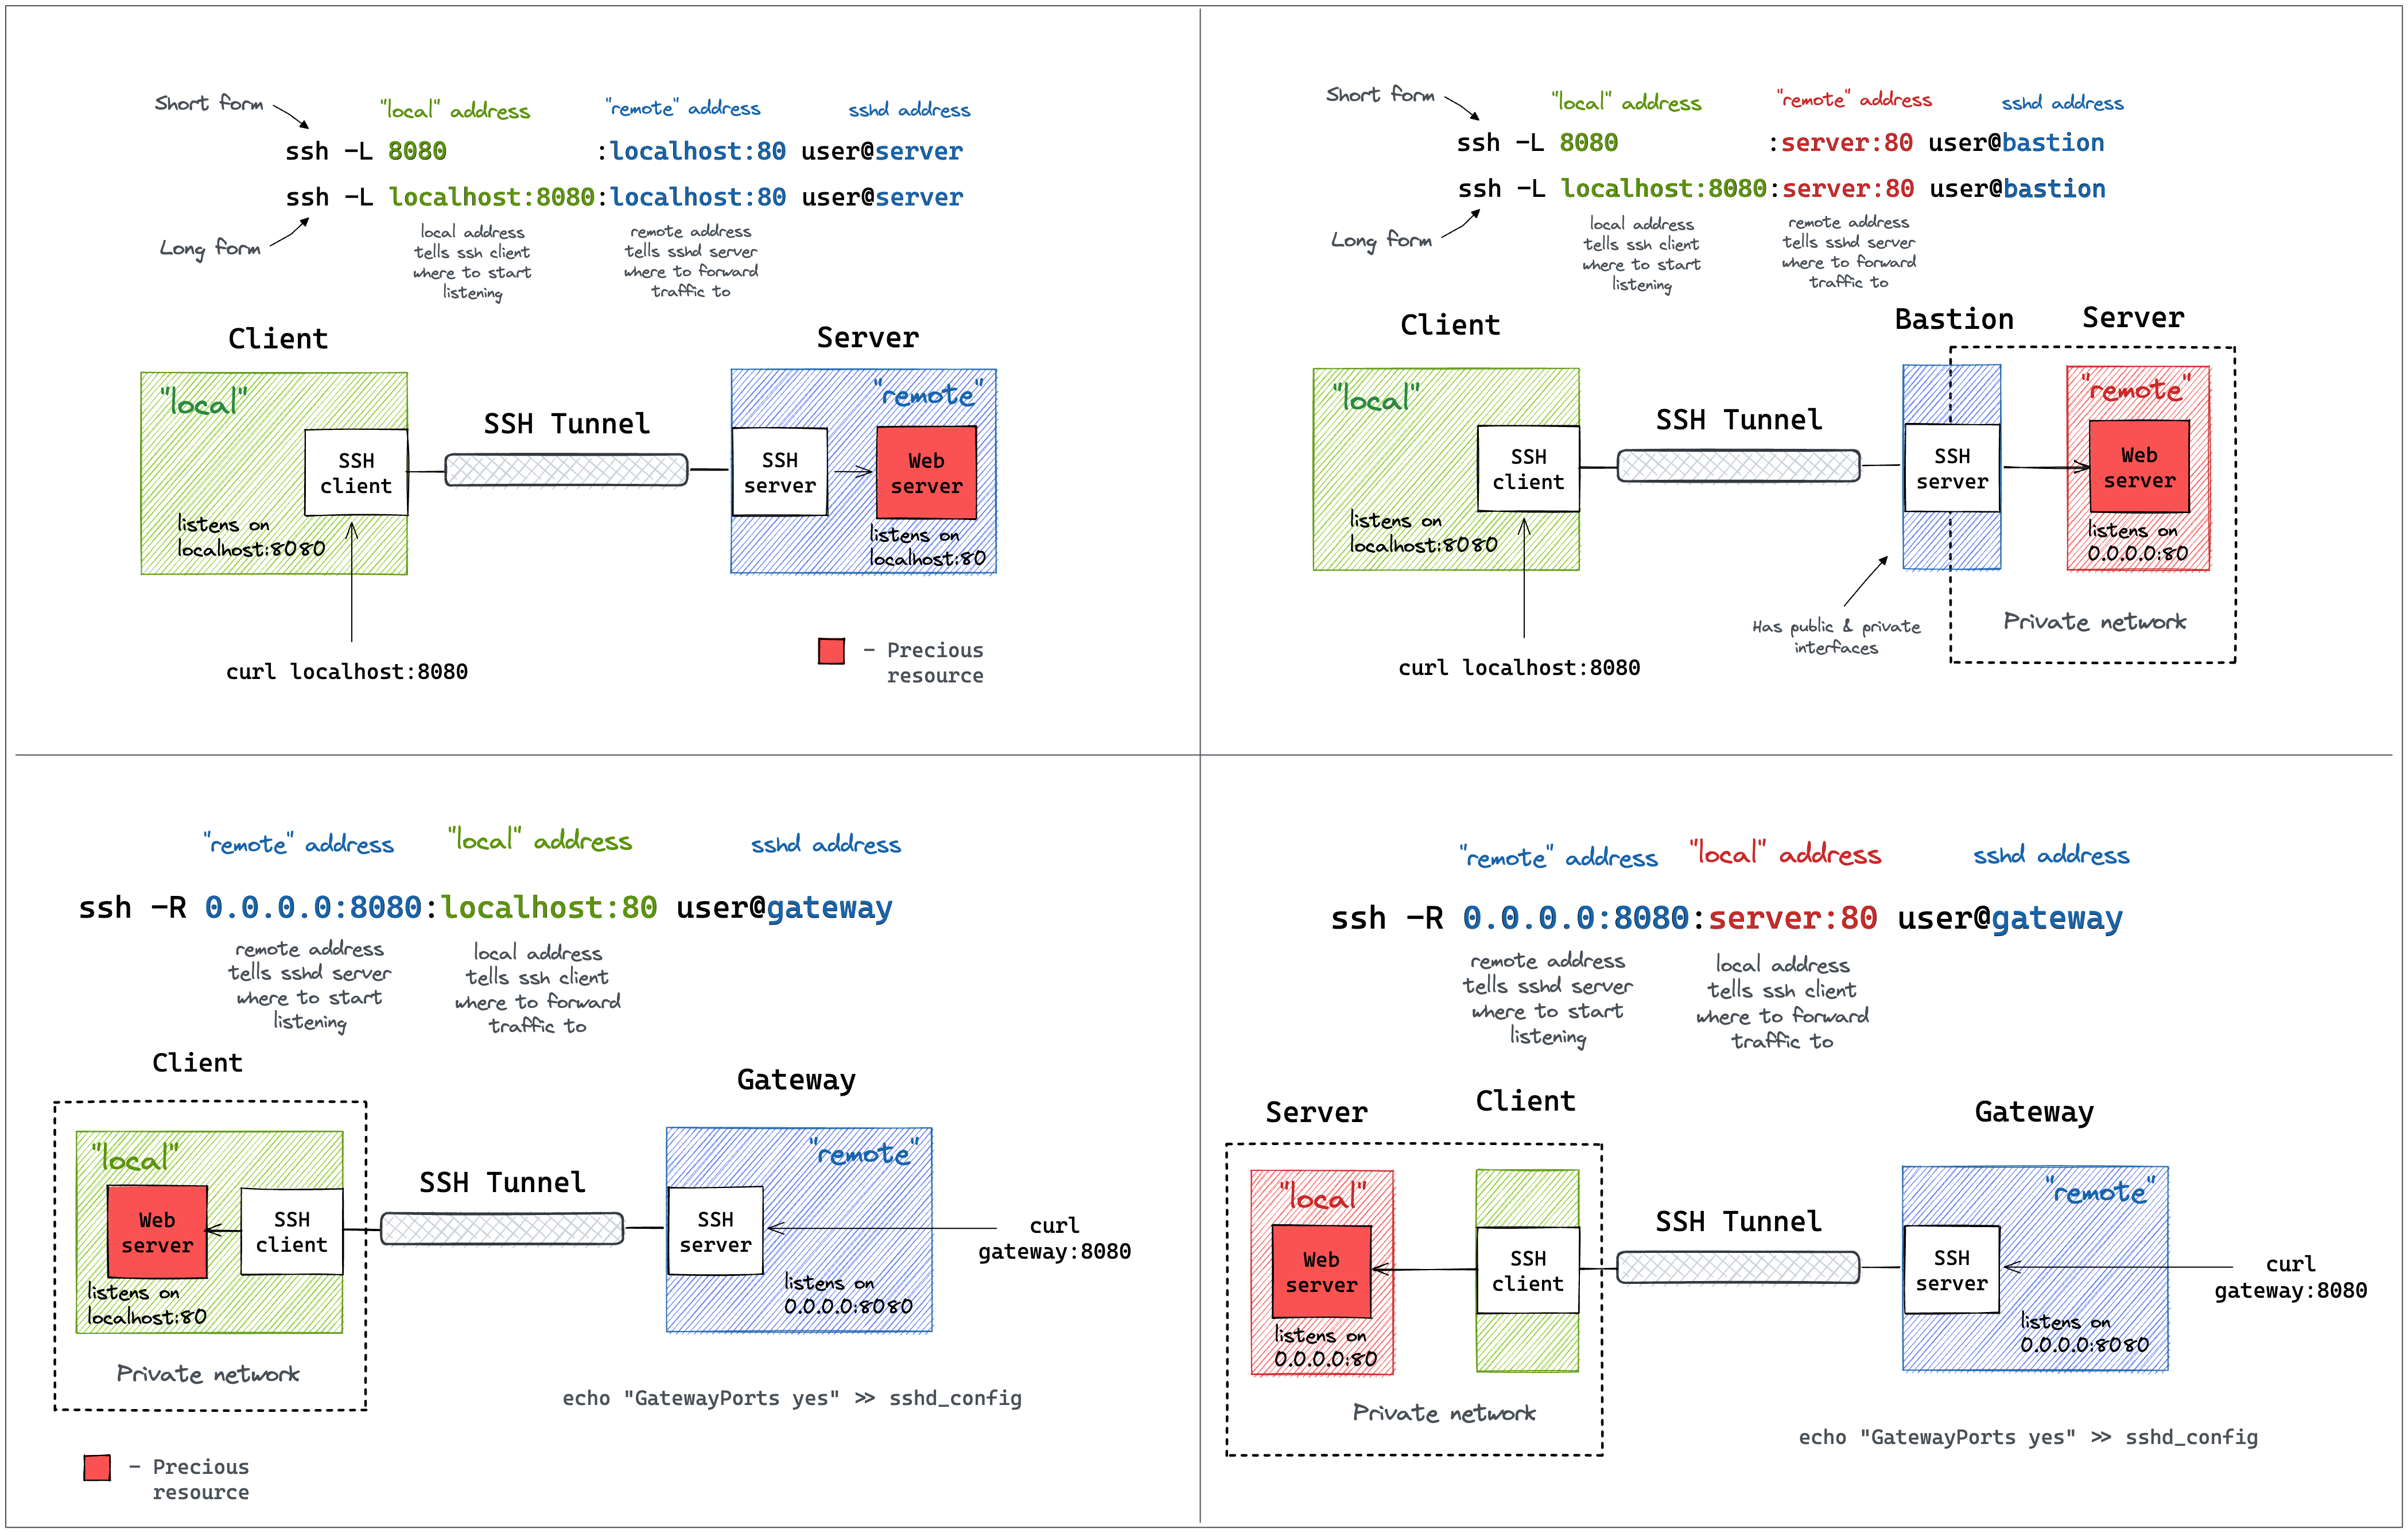
We’ve all seen these great diagrams of how SSH port forwarding works but if your brain is anything like mine, these diagrams leave you with a lot of unanswered questions. If you’re on a red team, understanding how to traverse a network better than the people who designed it gives you immense power to do evil things. SSH is such a powerful tool but sometimes the syntax and other concepts can get in the way of us accomplishing our goals. In an effort to do more evil things in a timely fashion I’ve put together a massive list of SSH things that I find useful. You can read it too, but if I’m being honest, this is mostly for me. I’ve learned that I really don’t grasp concepts unless I have hands on keyboard time doing them. This post is essentially just everything I learned while doing so. Also I should point out that in all of these examples I am using a websever to demonstrate port forwarding but this can be done with almost any service including RDP, SQL, etc.
Since I've set this up a number of times, but I just realized I've never documented it on my blog, I thought I'd finally do that.
I have a set of servers that are running on a private network. That network is connected to the Internet through a single reverse proxy / 'bastion' host.
But I still want to be able to manage the servers on the private network behind the bastion from outside.
PuTTY is a free (MIT-licensed) Windows Telnet and SSH client. This manual documents PuTTY, and its companion utilities PSCP, PSFTP, Plink, Pageant and PuTTYgen.
Note to Unix users: this manual currently primarily documents the Windows versions of the PuTTY utilities. Some options are therefore mentioned that are absent from the Unix version; the Unix version has features not described here; and the pterm and command-line puttygen and pageant utilities are not described at all. The only Unix-specific documentation that currently exists is the man pages.
This manual is copyright 1997-2022 Simon Tatham. All rights reserved. You may distribute this documentation under the MIT licence. See appendix D for the licence text in full.

As enterprises accelerate their digital strategies, adoption of hybrid or multi-cloud architectures are becoming the new norm, requiring a fundamental shift in how infrastructure is provisioned and managed. When managing secure administration access to Unix-like servers, SSH is still the standard connectivity method. However, it does come with challenges and risks, especially in relation to key management.
Mitogen is a Python library for writing distributed self-replicating programs.
There is no requirement for installing packages, copying files around, writing shell snippets, upfront configuration, or providing any secondary link to a remote machine aside from an SSH connection. Due to its origins for use in managing potentially damaged infrastructure, the remote machine need not even have free disk space or a writeable filesystem.
It is not intended as a generic RPC framework; the goal is to provide a robust and efficient low-level API on which tools like Salt, Ansible, or Fabric can be built, and while the API is quite friendly and comparable to Fabric, ultimately it is not intended for direct use by consumer software.
The focus is to centralize and perfect the intricate dance required to run Python code safely and efficiently on a remote machine, while avoiding temporary files or large chunks of error-prone shell scripts, and supporting common privilege escalation techniques like sudo, potentially in combination with exotic connection methods such as WMI, telnet, or console-over-IPMI.
Theo App is the authorized keys manager, you can use it as replacement for all of your authorized_keys It allows you to set fine permissions (specific user and host) or to use wildcard (ex, using host %.test.sample.com)
ssh-agent is a program to hold in memory the private keys used by SSH for public-key authentication. When the agent is running, ssh forwards to it the signature requests from the server. The agent performs the private key operations and returns the results to ssh. It is useful if you keep your private keys encrypted on disk and you don’t want to type the password at each connection. Keeping the agent secure is critical: someone able to communicate with the agent can authenticate on your behalf on remote servers.
This describes a method for maintaining a separate ssh-agent to hold your ssh key for connecting to Toolforge/CloudVPS.
The problem
You use an ssh-agent to connect to your personal or company systems. You want to connect to Toolforge/CloudVPS using an agent and you created a separate ssh key to connect to Toolforge/CloudVPS, but you don't want to forward your personal key to Toolforge/CloudVPS systems. If you just add both keys to your existing agent, they both get forwarded to Toolforge/CloudVPS. It's a pain to constantly remove your personal key from your agent each time you want to connect to Toolforge/CloudVPS. Additionally, you might be connected to both your personal system and Toolforge/CloudVPS simultaneously, so just removing the key is insufficent; you must run a separate ssh-agent. You don't want to run one agent per connection because then you have to type your passphrase on every connection (and you have a nice long secure passphrase on your key).
This page describes a method for getting your shell to maintain two agents, your primary agent and your Toolforge/CloudVPS agent. When you connect to Toolforge/CloudVPS you connect to the existing Toolforge/CloudVPS agent (or create one if it doesn't exist) and the rest of the time you use your default agent.

Algo VPN is a set of Ansible scripts that simplify the setup of a personal IPSEC and Wireguard VPN. It uses the most secure defaults available, works with common cloud providers, and does not require client software on most devices. See our release announcement for more information.
So you’ve just rented a new server, in some random data center, from one of the popular hosting providers. You don’t have physical access to the machine, but you rely on your data to be stored securely on the server. You probably want to encrypt the entire system, even the swap partition. The server needs to be able to decrypt the filesystems to boot, but you don’t want the encryption key to be accessible by it, so nobody with physical access can access your data or even tamper with it.
Features
- Split tmux window into multiple panes
- Build command lines & execute them on the panes
- Runnable from outside of tmux session
- Runnable from inside of tmux session
- Record operation log
- Flexible layout arrangement for panes
- Select layout presets
- Set columns or rows as you like
- Display pane title on each pane
- Generate command lines from standard input (Pipe mode)

KeePassXC is a community fork of KeePassX, a native cross-platform port of KeePass Password Safe, with the goal to extend and improve it with new features and bugfixes to provide a feature-rich, fully cross-platform and modern open-source password manager.
This article details my experiment on the matter. It is partly based on first hand experience, but also links to various other tutorials that helped me along the way. Especially thanks to folks on various IRC channels that really helped me out in understanding this.
Dan Farmer is known for his groundbreaking work on security tools and processes. Over the last year, Dan has identified some serious security issues with the Intelligent Platform Management Interface (IPMI) protocol and the Baseboard Management Controllers (BMCs) that speak it. This post goes into detail on how to identify and test for each of the issues that Dan identified, using a handful of free security tools. If you are looking for a quick overview of the issues discussed in this post, please review the FAQ. Dan has also put together an excellent best practices document that is a must-read for anyone working on the remediation side.