XSecureLock is an X11 screen lock utility designed with the primary goal of security.
Screen lock utilities are widespread. However, in the past they often had security issues regarding authentication bypass (a crashing screen locker would unlock the screen), information disclosure (notifications may appear on top of the screen saver), or sometimes even worse.
In XSecureLock, security is achieved using a modular design to avoid the usual pitfalls of screen locking utility design on X11. Details are available in the Security Design section.

Let’s Encrypt client and ACME library written in Go.
Features
- ACME v2 [RFC 8555}(https://www.rfc-editor.org/rfc/rfc8555.html)
- Register with CA
- Obtain certificates, both from scratch or with an existing CSR
- Renew certificates
- Revoke certificates
- Robust implementation of all ACME challenges
- HTTP (http-01)
- DNS (dns-01)
- TLS (tls-alpn-01)
- SAN certificate support
- Comes with multiple optional DNS providers
- Custom challenge solvers
- Certificate bundling
- OCSP helper function
github: LEGO

Gitea lacks the ability to host static pages from Git. The Codeberg Pages Server addresses this lack by implementing a standalone service that connects to Gitea via API. It is suitable to be deployed by other Gitea instances, too, to offer static pages hosting to their users.
End user documentation can mainly be found at the Wiki and the Codeberg Documentation.
Gitea is a painless self-hosted Git service. It is similar to GitHub, Bitbucket, and GitLab. Gitea is a fork of Gogs. See the Gitea Announcement blog post to read about the justification for a fork.

Tea Runner is an application that runs on a host and carries out simple actions whenever Gitea triggers it with a webhook. It's designed with minimalism in mind. It's much less capable than Gitlab pipelines or Github actions. But on the flip side, it's far easier to configure than Jenkins or Drone.
Out of the box, Tea Runner can:
- Copy newly committed files to a remote directory.
- Build a new Docker image on a remote host.
Summary
- Having a secrets manager that hands out secrets to services and clients is useful, because it allows you to prevent materialization of secrets.
- One of the primary features of clouds (private and public) would be that the control-plane of the cloud can attest identity of instances, and would allow you to solve authentication trivially. Sadly, Openstack and all Openstack derives private and public clouds seem to not implement that (and thus offer no IAM to services based on control-plane trust).
- For those where the cloud control-plane does not offer IAM, Hashivault can help out a lot.
- Some applications have the ability to have multiple passwords per identity, to allow easier password rotation.
- The value of that feature is greatly diminished by a lack of observability. Any control is only complete if it can be verified to work. We need to be able to see if old deprecated passwords are unused in order to safely deprovision them.
- Even without multiple passwords, we can always leverage a secrets manager and some relatively simple external driver to rotate accounts instead.
- This is complicated by the fact that many applications bind authorizations (access permissions) to identities (usernames).
- We can use roles to work around that, and assign authorizations to these roles, then have the identity inherit from the role.
- Implementing either account rotation or password rotation still requires additional work: an external driver, safeguards, monitoring and alerting, plus an update of the documentation. In neither case you will be done by simply turning on a feature.

The Concepts section helps you learn about the parts of the Kubernetes system and the abstractions Kubernetes uses to represent your cluster, and helps you obtain a deeper understanding of how Kubernetes works.
Ansible is an IT automation tool. It can configure systems, deploy software, and orchestrate more advanced IT tasks such as continuous deployments or zero downtime rolling updates.
Ansible’s main goals are simplicity and ease-of-use. It also has a strong focus on security and reliability, featuring a minimum of moving parts, usage of OpenSSH for transport (with other transports and pull modes as alternatives), and a language that is designed around auditability by humans–even those not familiar with the program.
We believe simplicity is relevant to all sizes of environments, so we design for busy users of all types: developers, sysadmins, release engineers, IT managers, and everyone in between. Ansible is appropriate for managing all environments, from small setups with a handful of instances to enterprise environments with many thousands of instances.
You can learn more at AnsibleFest, the annual event for all Ansible contributors, users, and customers hosted by Red Hat. AnsibleFest is the place to connect with others, learn new skills, and find a new friend to automate with.
Ansible manages machines in an agent-less manner. There is never a question of how to upgrade remote daemons or the problem of not being able to manage systems because daemons are uninstalled. Also, security exposure is greatly reduced because Ansible uses OpenSSH — the open source connectivity tool for remote login with the SSH (Secure Shell) protocol.
Ansible is decentralized–it relies on your existing OS credentials to control access to remote machines. And if needed, Ansible can easily connect with Kerberos, LDAP, and other centralized authentication management systems.
This documentation covers the version of Ansible noted in the upper left corner of this page. We maintain multiple versions of Ansible and the Ansible documentation, so please be sure you are using the documentation version that covers the version of Ansible you are using. For recent features, we note the version of Ansible where the feature was added.
Ansible releases a new major release approximately twice a year. The core application evolves somewhat conservatively, valuing simplicity in language design and setup. Contributors develop and change modules and plugins hosted in collections since version 2.10 much more quickly.

Podman is a daemonless container engine for developing, managing, and running Open Container Initiative (OCI) containers on Linux systems. Included in Red Hat Enterprise Linux 7.6 and later, Podman lets you create and manage rootless containers, which don't require root access to be built and deployed.
Podman is an excellent alternative to Docker containers when you need increased security, unique identifier (UID) separation using namespaces, and integration with systemd.
Download the Podman Cheat Sheet and explore basic commands for managing images, containers, and container resources. You’ll learn how to:
- Work with image repositories
- Build container images
- Create and run containers
- Manage container processes and resources
- Work with a host compiler’s file system
With Red Hat Developer cheat sheets, you get essential information right at your fingertips so you can work faster and smarter. Easily learn new technologies and coding concepts and quickly find the answers you need.

The original Quadlet repository describes Quadlet this way:
What do you get if you squash a Kubernetes kubelet?
A quadlet
Quadlet is a tool for running Podman containers under systemd in an optimal way by allowing containers to run under systemd in a declarative way. It has been merged into Podman 4.4.

Welcome
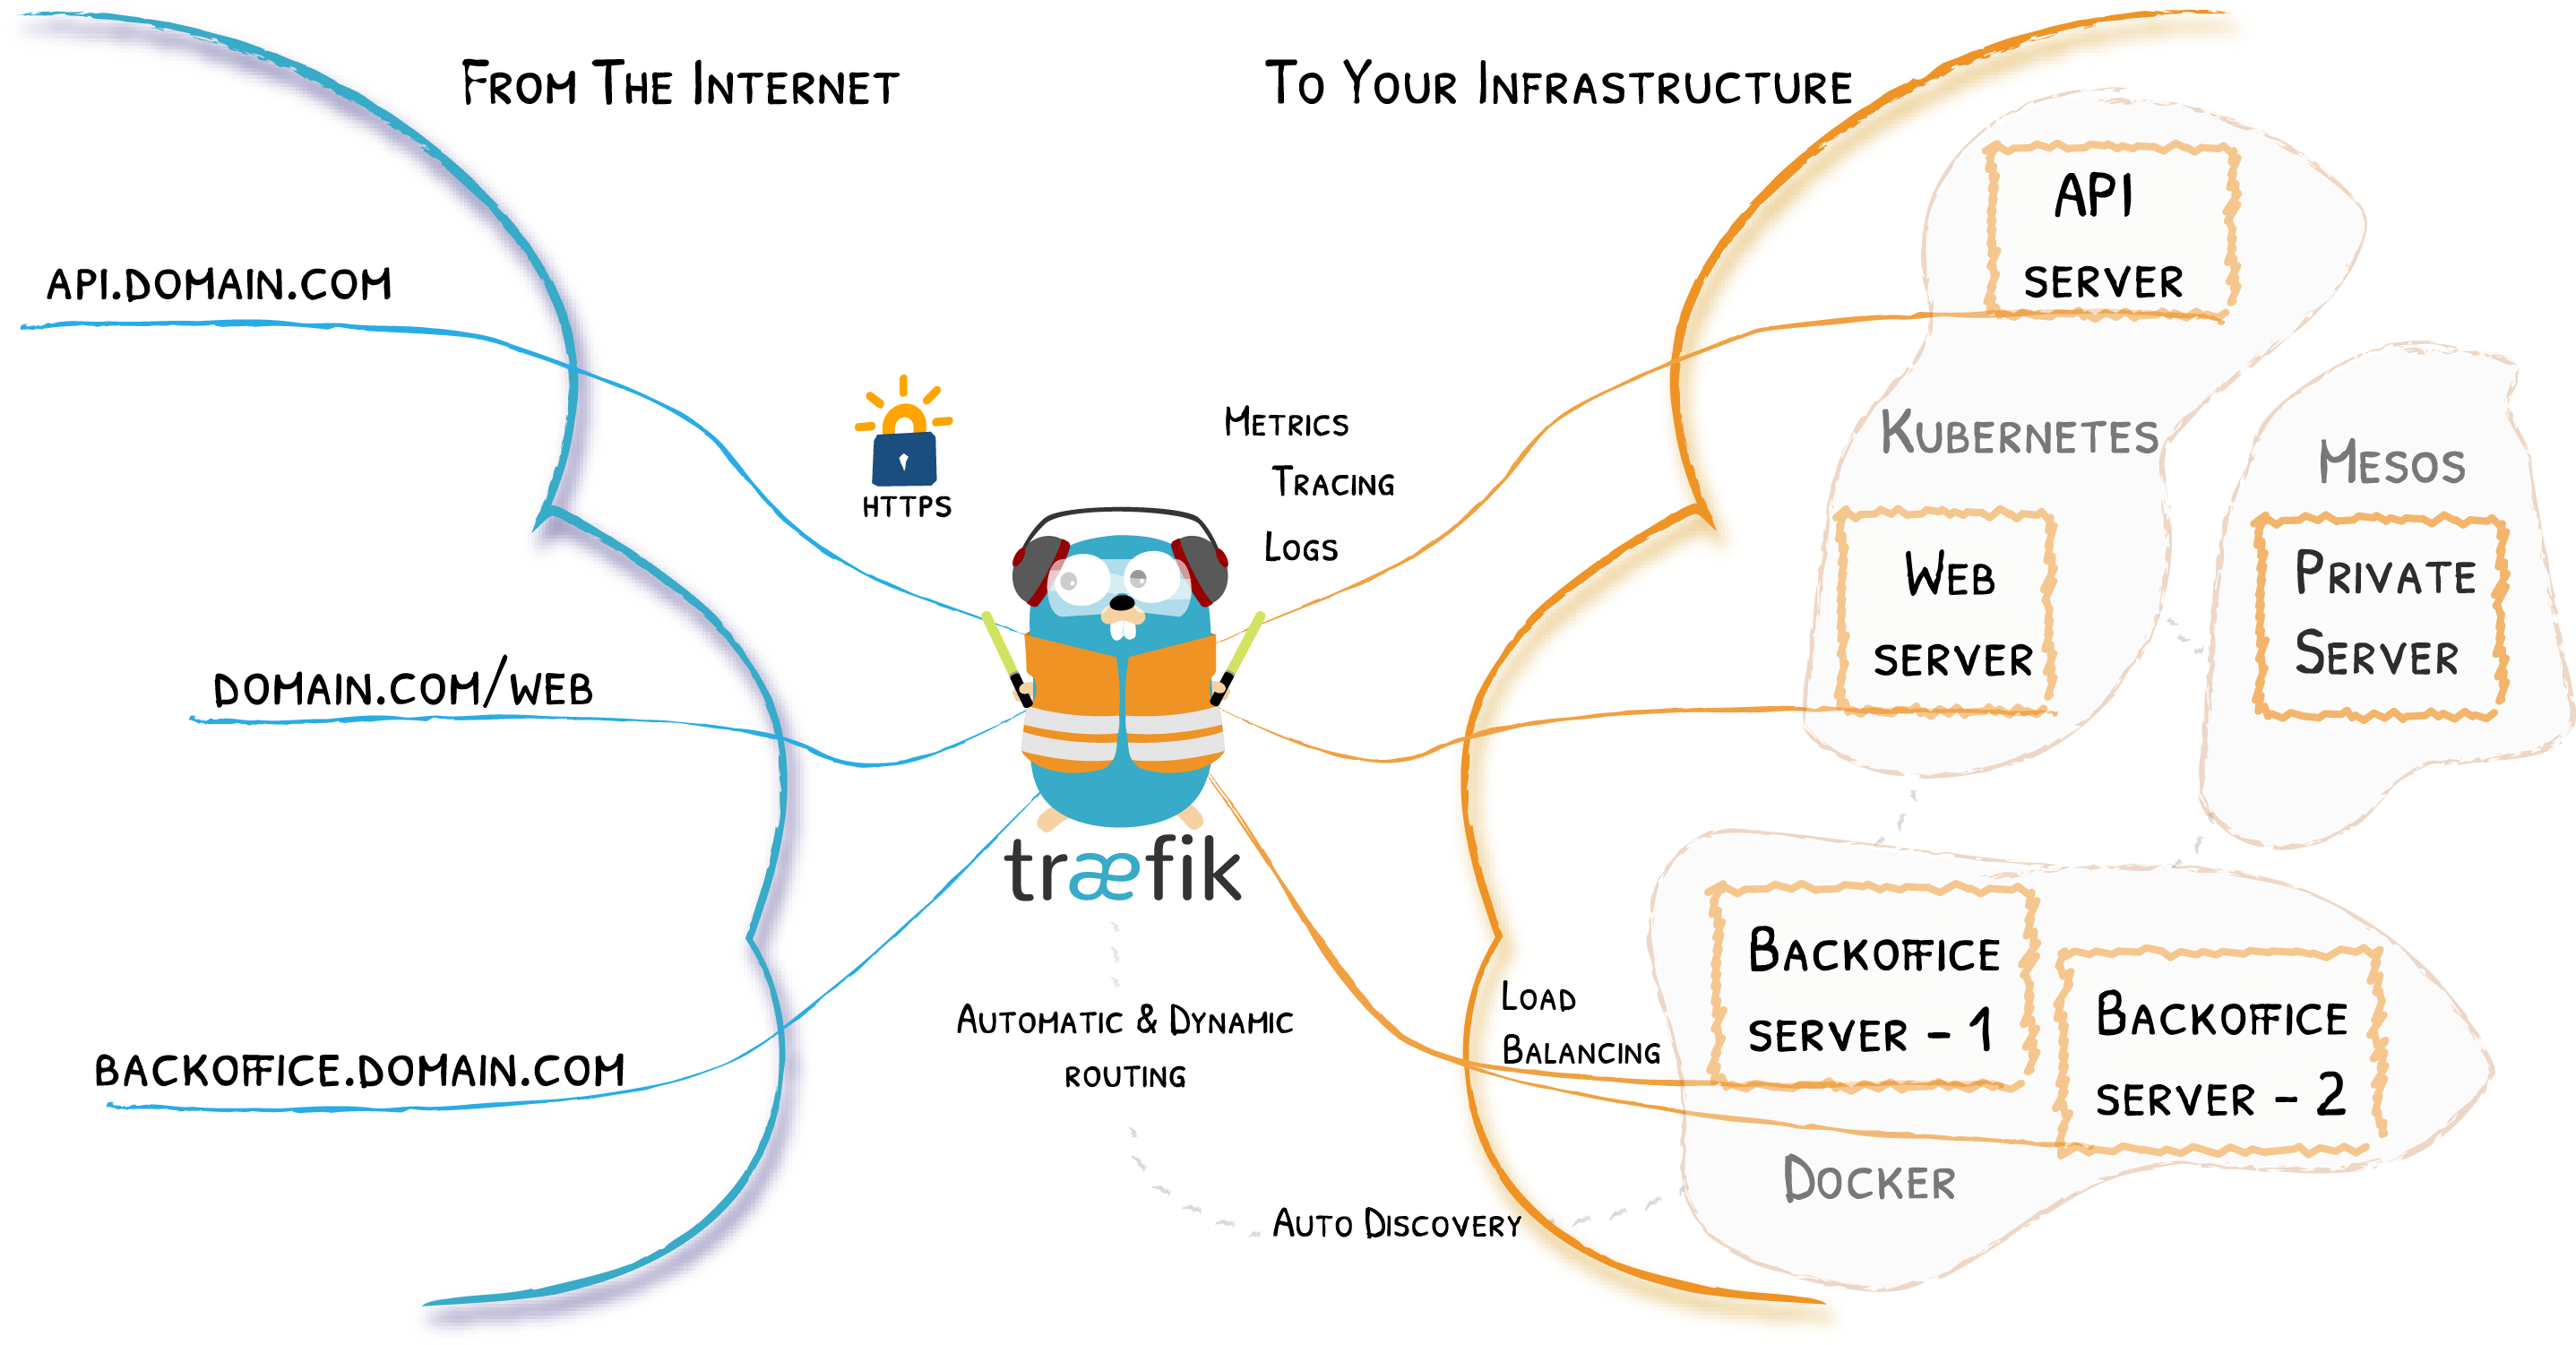
Traefik is an open-source Edge Router that makes publishing your services a fun and easy experience. It receives requests on behalf of your system and finds out which components are responsible for handling them.
What sets Traefik apart, besides its many features, is that it automatically discovers the right configuration for your services. The magic happens when Traefik inspects your infrastructure, where it finds relevant information and discovers which service serves which request.
Traefik is natively compliant with every major cluster technology, such as Kubernetes, Docker, Docker Swarm, AWS, Mesos, Marathon, and the list goes on; and can handle many at the same time. (It even works for legacy software running on bare metal.)
With Traefik, there is no need to maintain and synchronize a separate configuration file: everything happens automatically, in real time (no restarts, no connection interruptions). With Traefik, you spend time developing and deploying new features to your system, not on configuring and maintaining its working state.
Developing Traefik, our main goal is to make it simple to use, and we're sure you'll enjoy it.
This guide demonstrates the most common aspects of libvirt networking, whether running virtual machines (VMs) on a dedicated server or within a home lab.
How to choose a network type
On a dedicated server — where VMs often need to be publicly accessible — a Bridged network is ideal and allows each VM to bind to its own public IPv4 and IPv6 addresses. If bridging is not possible, create a Routed network. If the server has limited public IPv4 addresses, a NAT-based network that forwards incoming connections may be the only option.
Inside an intranet or home lab, a NAT-based network gives VMs outbound network access. If VMs are running services that must be accessible from other systems on the LAN, create a Bridged network (for an Ethernet connected libvirt host) or a Routed network (for a wirelessly connected libvirt host).
If you want to prevent libvirt from automatically inserting iptables rules, create a Bridged network, Custom routed network, or Custom NAT-based network.
Contents
WireGuard is a fast and modern VPN protocol.
It is a point-to-point VPN, which means it does not have a client-server architecture, but peers, and does not rely on a PKI, unlike OpenVPN. It is super simple to setup to connect multiple machines together.
WireGuard supports roaming, which means you can switch between network connections and not have to reconnect to your peers. On servers, it’s rarely useful, but when one of the peer is a mobile client like a laptop or a smartphone, it’s a life saver, because the usage of WireGuard is completely transparent.
I’m used to OpenVPN, I even maintain a quite popular script, but WireGuard is better in pretty much all aspects.

Running Vault on Kubernetes is generally the same as running it anywhere else. Kubernetes, as a container orchestration engine, eases some of the operational burdens and Helm charts provide the benefit of a refined interface when it comes to deploying Vault in a variety of different modes.
In this tutorial, you will set up Vault and its dependencies with a Helm chart. You will then integrate a web application that uses the Kubernetes service account token to authenticate with Vault and retrieve a secret.


Lightweight Kubernetes. Easy to install, half the memory, all in a binary of less than 100 MB.
Great for:
- Edge
- IoT
- CI
- Development
- ARM
- Embedding K8s
- Situations where a PhD in K8s clusterology is infeasible
management user interface
- Manual section: 1
- Manual group: Virtualization Support


-
Deployment / operation
- Applications - Applications known to use libvirt
- Manual pages - Manual pages for libvirt tools / daemons
- Windows - Downloads for Windows
- macOS - Working with libvirt on macOS
- Migration - Migrating guests between machines
- Daemons - Overview of the daemons provided by libvirt
- Remote access - Enable remote access over TCP
- TLS certs - Generate and deploy x509 certificates for TLS
- Authentication - Configure authentication for the libvirt daemon
- Access control - Configure access control libvirt APIs with polkit
- Logging - The library and the daemon logging support
- Audit log - Audit trail logs for host operations
- Firewall - Firewall and network filter configuration
- Hooks- Hooks for system specific management
- NSS module - Enable domain host name translation to IP addresses
- FAQ - Frequently asked questions
-
Application development
- API Reference
- ...
-
Project development
- ...
- API concepts
- ...
This page describes the basics of the virtual machine lifecycle. Its aim is to provide fundamental information to create, run, stop, migrate and delete a virtual machines in one page.

The libvirt project:
- is a toolkit to manage virtualization platforms
- is accessible from C, Python, Perl, Go and more
- is licensed under open source licenses
- supports KVM, Hypervisor.framework, QEMU, Xen, Virtuozzo, VMWare ESX, LXC, BHyve and more
- targets Linux, FreeBSD, Windows and macOS
- is used by many applications
This document is a guide for installing Arch Linux using the live system booted from an installation medium made from an official installation image. The installation medium provides accessibility features which are described on the page Install Arch Linux with accessibility options. For alternative means of installation, see Category:Installation process.
Before installing, it would be advised to view the FAQ. For conventions used in this document, see Help:Reading. In particular, code examples may contain placeholders (formatted in italics) that must be replaced manually.
This guide is kept concise and you are advised to follow the instructions in the presented order per section. For more detailed instructions, see the respective ArchWiki articles or the various programs' man pages, both linked from this guide. For interactive help, the IRC channel and the forums are also available.
Arch Linux should run on any x86_64-compatible machine with a minimum of 512 MiB RAM, though more memory is needed to boot the live system for installation.[1] A basic installation should take less than 2 GiB of disk space. As the installation process needs to retrieve packages from a remote repository, this guide assumes a working internet connection is available.